eDiplomaMCU: blogger

Translate to my Language

Showing posts with label blogger. Show all posts

Wednesday, July 14, 2021

Embed YouTube Videos on Blogging Website | Autoplay, Mute, Loop, Controls in Embed Videos

Blogging is a good career option to create own audience and earn revenue. Becoming a blogger is a challenging task nowadays. Usually there are very few bloggers who have approved Google Adsense for the blogging website. This is because of many reasons. While inserting any text, object, videos, etc we should be aware about the policies and rules of blogger. In this article I am going to explain about embed videos in blogging website and some other attributes of embedding videos using html like Autoplay, Mute, Loop and controls.

Embedding YouTube Videos on website
Embed Video on Blogger Posts

Before discussing about embedding tags and methods we should know the meaning of embedding. So let's understand one by one.

Inserting video- You can insert any video, YouTube video, by using insert video option from blogger menus. You can also give link of the YouTube video for inserting any video. You can also upload any existing video from your computer device to blogging posts.


Embed Video - Embed video enables linking any video source URL to the website or target location. Any changes on source video/file results changes on the video existing to your blogging website. Means, if you have any object (i.e. Google Forms) and have embedded to your blogging website, when you change anything on the object (Google Forms), the object will also be changed on the blogging website where you have already liked that.

Note: This article illustrates embedding YouTube videos, you can perform embedding different objects whether that is excel sheets, document file, google forms, or any kind of file type.

Embed YouTube Videos on Blogging Website

Simple meaning of embedding is linking. If you embed any file to other file type, that means you link other file to this one. You will also find embedding objects option in Microsoft Word as well. Now, you have understood that if you link any object using URL link, that means you are already using embedding option. There are two ways of embedding videos form YouTube on Blogger:


Way 1. - Click on three horizontal dots (as per 14/07/2021 dated layout type) and choose "insert video" the third one option to upload video. Choose second option, YouTube and then enter the URL after clicking search option existing there.
Uploading videos on Blogger
Insert Video on Blogger Posts

Way 2. - Better way to direct get embedding link is go to desktop YouTube and search for any video. Click on share option and you will find embed option. Click on that and copy the embed coding. And paste it now on the blogger posts getting html tags by choosing html view option.

video sharing on YouTube
YouTube video share: video URL

On the above image you can see the URL of the video. You can manually type <iframe> html tags and in the path under <src> tag, paste the URL of the video. Both the links for usual video link or embed link, the video URL will be same.


Embed video YouTube share tags
Embed video html tags: share YouTube video

Now you can copy embed video codes, this will save your time and extra effort. You can choose Embed option just below to the codes whether enabling the "controls" option or disabling it. Controls let you have controls like forward-backward the video, CC, setting etc options while playing the video. You can later define controls enable or disabled whatever you want.


Important tags - If you already know about embedding the videos but have problem where to paste html pages in html view on blogger. So you see <div> and <span> tags somewhere in between-last of the codes sections. <div> defines section area for different paragraph/content and it is application by line breaking while <span> does same without line breaking. So always paste html tags, like embed tags, just below the </div> option wherever you want.

Autoplay, Mute, Loop, Controls in Embed Videos

We have already learned about controls option. Further we will also see the manual way of editing the tags. On the above embed link, we find tags like below:

<iframe width="560" height="315" src="https://www.youtube.com/embed/2JfPVT6ATEI" title="YouTube video player" frameborder="0" allow="accelerometer; autoplay; clipboard-write; encrypted-media; gyroscope; picture-in-picture" allowfullscreen></iframe>

For adding any further tags like autoplay, mute, loop, controls etc, you need to add on highlighted area like mentioned below. 

(Note - 1. src tag in html is used to defined the path of location/url of any object
2. Use 0 for disagree to any tag permission, use 1 for agree tag permission. Same alike circuit GATE of physics/mathematics rules)


Autoplay in Embed YouTube Video - You need to add autoplay tag end of the src section adding ? (question mark) like below:
src="https://www.youtube.com/embed/2JfPVT6ATEI?autoplay=1" (if you put 0 instead of 1, the video will not be auto-played)

Mute in Embed YouTube Video - You need to add mute tag end of the src section adding ? (question mark) like below:
src="https://www.youtube.com/embed/2JfPVT6ATEI?mute=1" (if you put 0 instead of 1, the video will not be muted)

Loop in Embed YouTube Video- You need to add loop tag end of the src section adding ? (question mark) like below:
src="https://www.youtube.com/embed/2JfPVT6ATEI?playlist=2JfPVT6ATEI&loop=1" (if you put 0 instead of 1, the video will not be looped)


Controls in Embed YouTube Video- You need to add controls tag end of the src section adding ? (question mark) like below:
src="https://www.youtube.com/embed/2JfPVT6ATEI?controls=1" (if you put 0 instead of 1, the video will not be controlled)

Combined use Autoplay, Mute, Loop, Controls tag in Embed Videos - You need to add autoplay, mute, loop, controls tags end of the src section adding ? (question mark) like below:
src="https://www.youtube.com/embed/2JfPVT6ATEI?autoplay=1&mute=1&controls=1&playlist=2JfPVT6ATEI&loop=1" (if you put 0 instead of 1, the video will not be auto-played)

For adding two or more tags you need to separate with & (shift+7) option. Also heed, loop option is something different from other tags.


Autoplay - This is used for autoplay your video. By using this option your video will automatically be played on the browser. This will help you to get views on your YouTube videos and instant video support about the article you are explaining about.

Mute - This will mute the video on the browser by default. The user need to click on sound icon to enable or re-disable it.

Loop - This will make your video be played for ever. After getting end of your video, the video will be replayed.


Controls - This option will remove many control options from Embed video if you disable it by assigning 0 to the value.


On below embed video on this article's subject, I have used Autoplay, Mute, Loop, Controls tags and have assigned 1 (enabled). PS - I have given control for the video below, because I wanted to mute it and if you do not have control over the below video, the video could not be unmuted.

Tuesday, July 6, 2021

HOW TO USE ALT TEXT, TITLE TEXT & CAPTION IN BLOGGER: LEARN ALT TAG IN HTML/BLOGGER

 Blogging is a good career option if someone write genuine helpful articles. There are many people who have knowledge but have some lack of blogging secrets like SEO, keywords etc. In this article I will discuss about inserting image on blogging website and adding some important features like Alt Text, Title Text & Caption and further will discuss about alt tag usage in html/blogger.

Thumbnail of "How to use alt text, title text and caption..."
Use of Alt text Title text and Caption in Blogger

Generally we insert images on Blogger from uploading from computer, google photos, existing photos on blogger or by using URL from the web/internet. When we upload any image from internet, there is high possibility of copyright segment or any other violation of the blogging policies. Uploading images from the internet can make alternative changes on the photos/images uploading on your blogging website, like your image may be removed, or may have any kind of defection in future.

READ MORE: HOW TO REMOVE E-BOOKS FROM GOOGLE PLAY BOOKS PARTNER CENTER?

HOW TO USE ALT TEXT, TITLE TEXT & CAPTION IN BLOGGER: LEARN ALT TAG IN HTML/BLOGGER

I share my personal experience. In my initial days of blogging, I used to get url for the pictures to insert on my blogging posts. After a days I realized that some of the photos are removed from the posts and this resulted my posts damaged in sense of traffic reliability. I was getting more views on those posts which pictures were automatically deleted/removed. I realized my mistake and from then, I never use any picture directly from URL of any picture over the internet. I capture, edit pictures before I upload for blogging posts.

As you insert any image and select the image by mouse click, you will get setting options where you find these options. You also get A option for caption for the image on blogger. Now let's discuss about various uses of subjected topics-

USE OF ALT TEXT - Sometimes internet connectivity of our computer goes weak, or due to some technical problems like copyright infringements, the inserted images get removed from the posts, there only looks an icon of inserted image but the user/reader cannot understand about the image. We use <img src="...."> tag for inserting any image using html. 

alt tag html codes
html coding with result on right side

But sometimes when the image is deleted/removed or invisible because of technical reasons, only image icon is shown on the page. By using the Alt Text from blogger or by using alt tag using html view on blogger, we can define the subject of the image. When the image is invisible due to any reason, the text will be appearing defining about the image.

READ MORE: IS SWAGBUCKS LEGIT OR SCAM? WHY DO YOUTUBERS MAKE VIDEOS ON SCAMMING ONLINE EARNING WEBSITE?

TITLE TEXT - This is used to show the title of the image. When you bring mouse cursor on the image (you need not to click), the title text will be appearing. Like I have given title text "Click to watch video in Hindi" on the above image. This option is used when you want to convey any message direct to your readers.

CAPTION - Caption is used for adding additional textual information with information. Like every images on this blog article have captions just below every images. Caption can convey additional message/information to users in less words.

READ MORE: HOW TO EARN MONEY ONLINE: GENUINE WEBSITES THAT PAY HANDSOME AMOUNT

SHOULD WE USE ALT TEXT, TITLE TEXT & CAPTION AND BLOGGING SEO - We should use alt text, title text & caption with every images. This will help look our blogger posts more attractive and helpful, also it will look more professional. Actually all these options are optional but you should use it for blogging SEO. Appearing or non-appearing content in blogging articles (attached with images) are also treated as keywords on blogger. This indeed helps for search engine optimization. Resultant, your blogger may get more rankings in Google SEO.

ALT TAG IN HTML/BLOGGER HTML VIEW - Alt Text option is directly given on blogger image insertion option, but if you do not find this option while working on other platforms, you can use html tag directly. You should use tag like below:

<img src="c:/xyz.jpg" alt="thumbnail of YouTube">

Hope this article is useful for you. You can watch video Alt Text, Title Text और Caption का ब्‍लाॅगर में प्रयोग | How to use Alt Tag in Blogger/html in Hindi
Visit our YouTube Channel "DigitalSoftHub" for more updates

Friday, February 5, 2021

HOW TO ADD HOME BUTTON ON BLOGGER SITE

 For bloggers it is very vital to use home tab in his blogger site, because if he uses various category posts then user / reader must like to surf blogger throughout home page. Home page options gives an option to readers to go to home page and as all you know that home page is the first page you see on a website.

Home Tab on my Blogger site


In this blog article you are going to see the way of adding "Home Page" button on your blogger website. You will also get to know that what options you get in that section from where you will be adding the Home Tab on your posts.This will obviously make your readers / audience comfortable with your blog articles.


STEPS OF ADDING "HOME PAGE" TAB ON BLOGGER - 

Step - 1. First search "blogger.com" in search engine with your blogger gmail ID. A dashboard will be opened liked given below. Click on "Layout" tab.
Page Layout option at Dashboard of Blogger


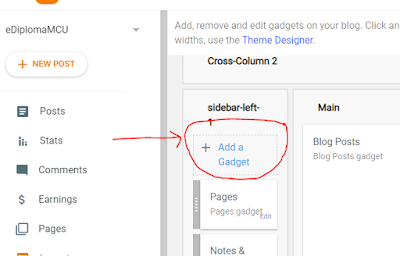
Step - 2. After clicking at "Layout" option will will see some options and options of "Add a Gadget" as well. Click on "+ Add a Gadget" option.
Gadget adding option in Layouts on Blogger

Step - 3. After clicking at that option you will get a dialogue box where you get option of 26 different gadgets.
different gadgets in "Add a Gadget" option


Step - 4. Scroll down. You will find "Pages" gadget in dialogue box. Click on plus sign.
Pages gadget in dialogue box


Step - 5. Now you will get another dialogue box after clicking on plus icon under Pages gadget. You have to fill all details as of your need. You can give title of your entry if you want. Give the name of "Home Tab", you can see what you enter is reflected other side, that will be reflected on your blogger website.
Configure page list option under Pages

Step - 6. Click at Save option highlighted in orange color. Now the "Home Button" will be appearing and working on your blogger website.


Hope this solved your query. If you have any problem related to Technical, Blogger, Education, YouTube etc, just contact us. Do subscribe my YouTube Channel "Digital Soft Hub" for latest vital updates.

Thanks & Regards,

Abhishek Kumar Tripathi


Tuesday, April 28, 2020

HOW TO BLINK TEXT OR OBJECT IN HTML / BLOGGER

Preface: You search for blinking tag in html or blogger but you get upset when no one is working. Mostly you will find <blink> tag over internet. But yes, those are not working. So I have made coding for you. You just have to type at Notepad and then paste to the html section. This will not only make your website looking attractive but it makes an impression to the coming users at your site. You can use this code everywhere that supports html coding. Hope you will like it and be benefited. 


If you are facing difficulty understanding how to apply procedures, Visit This videos by clicking the links:


Solution: Not to worry I'm with you. Just see the sources below and after that you can see how that looks alike. I have prepared this code that will sure make looking good your website / blogger posts. You can use this code to emphasize on particular object or text. You can simple type these codes on Notepad on your computer and follow the steps I have mentioned before. You have to put blinking required text where you generally type your text on normally blog html posts.

<html>
  <head>
    <title>Title of the document</title>
    <style>
      .blink {
      animation: blinker 0.6s linear infinite;
      color: #1c87c9;
      font-size: 30px;
      font-weight: bold;
      font-family: sans-serif;
      }
      @keyframes blinker {  
      50% { opacity: 0; }
      }
      .blink-one {
      animation: blinker-one 1s linear infinite;
      }
      @keyframes blinker-one {  
      0% { opacity: 0; }
      }
      .blink-two {
      animation: blinker-two 1.4s linear infinite;
      }
      @keyframes blinker-two {  
      100% { opacity: 0; }
      }
    </style>
  </head>
  <body>
    <p class="blink">text will blink once per again</p>
    <p class="blink blink-one">text will blink starting with 0% opacity</p>
    <p class="blink blink-two">text will blink starting with 100% opacity</p>
  </body>
</html>

This result on web-page will be like below:


Title of the document

Watch video in English:

Watch video in Hindi:

Final Words: If you have any problem typing these codes. You just have to Email Me I will provide the codes over email. I have kept this protected because I do not want my text to be copied from. If you also want to keep protected your texts / materials follow the link given below and be safe from cyber intruders:

Secure your content over web-page (Click the underlined content to read the article)

Thus way your digital asset will work for you and with proper channel of Adsense, you will be eligible to earn fortune. This code will help you to make secure your every content over your blogger posts.

Friday, April 24, 2020

HOW TO SECURE YOUR BLOGGER POSTS FROM COPY PASTE CONTENT

Preface:- If you work hard in study & research then work on blogs, if someone steals you content how will you feel? 😞
stop copy paste from your blogger
Many times it is seen that your content is theft from your website and due to not prevailing of copyright ownership you don't get real appreciation or attention for your hard work. This query is really problematic. Many time even I think for same. But luckily I learned coding and designed coding for protecting our content. We apply this code to different sites and provided to different clients. This is really so good that I earned appreciation and blessings. So now have a look on following codes and use in your blogger / website as guided.

So guys now Keep in Mind what you have to do. First read the steps below then understand by the images I have provided. And remember the code what you have to paste there is highlighted and in blue color. I didn't recommend copy paste because I want you should type it on your computer notepad. If you get any difficulties or want direct this codes, just mail me (digitalsofthub@gmail.com).


<script src='demo-to-prevent-copy-paste-on-blogger_files/googleapis.js'></script>
<script type='text/javascript'>
if (typeof document.onselectstart!="undefined" ) { document.onselectstart=new Function ("return false" );
} else { document.onmousedown=new Function ("return false" ); document.onmouseup=new Function ("return true" );
}
</script>


Here are the steps to remove copy paste option on your website:
  1. Step 1: Go Layout Tab in Left side of blogger menu.
  2. Step 2: Click on Add a Gadget. ( You can choose anywhere on sidebar or lowerbar or footer as this won't appear.)
  3. Step 3: Now choose widget name HTML/Javascript.  

First Go to Layout 
Click on Add gadgets and choose HTML/JavaScript

Finally paste the highlighted directed codes like below and apply save
You don't need to write anything in title
Now your blog is full safe. No one can steal your content now. Cheers! 

😃

Watch Video in English :

Watch Video in Hindi :

By using this code you can make sure your property locked. You can earn money from Google Adsense after applying for adsense, if you are writing original helpful content you will be able for applying for same. This is very crucial code that makes your content safe from cyber theft. 

If you have any other query relating blogger, just ask in the comment box.